Honeycomb, Meet Terraform
The best mechanism to combat proliferation of uncontrolled resources is to use Infrastructure as Code (IaC) to create a common set of things that everyone can get comfortable using and referencing. This doesn’t block the ability to create ad hoc resources when desired—it’s about setting baselines that are available when people want answers to questions they’ve asked in the past.

By: Mike Terhar

Most SaaS products have nice, organic growth when they work well. Employees log in, they click around and make stuff, then they share links with others who do the same. After a few weeks or months, there are thousand of objects. Some are abandoned, and some are mission-critical. Different people also bring different perspectives, so they name things that are relevant to their role and position in the team, which may be confusing to others outside their realm.
The best mechanism to combat this proliferation of uncontrolled resources is to use Infrastructure as Code (IaC) to create a common set of things that everyone can get comfortable using and referencing. This doesn’t block the ability to create ad hoc resources when desired—it’s about setting baselines that are available when people want answers to questions they’ve asked in the past.
Honeycomb’s resources
At Honeycomb, the things people make are:
- Derived columns
- Queries
- Boards
- Triggers
- SLOs
Each has a pleasant user interface for creating, reviewing, editing, and iterating. They also have an API that can be used to programmatically generate and manage them.
Get started from nothing
If you currently don’t have many Boards in Honeycomb, you can start with our helpful starter packs.
Many Honeycomb users send us data from OpenTelemetry which has some standard field conventions and a lot of auto-instrumentation. Since these are common across any applications that use OpenTelemetry, we created a Starter Pack for OpenTelemetry which creates some derived columns and boards to get you started.
This has been bundled as a Terraform module so you can use it by including a reference to the module and then entering a few variables.
Ad hoc is also a good start
The things people create and use are a good starting point when you want to move into an IaC world. For example, developers create a derived column to highlight when their feature was hit. Then, they add an SLO to show when errors were encountered on those traces. Finally, they add an alert to the SLO that tells them to investigate if the error rate climbs above the regular noise thresholds.
That series of three resources is bringing profound value to that team.
Handcrafted IaC
If you’re on a small team which is relatively new to Honeycomb and want to hand-spin IaC resources, please check out our documentation. We are also happy to help in our Pollinators slack.
The query spec is the most complicated. We added a helper to the query builder where you can View Query Definition for API from a query you’ve created.
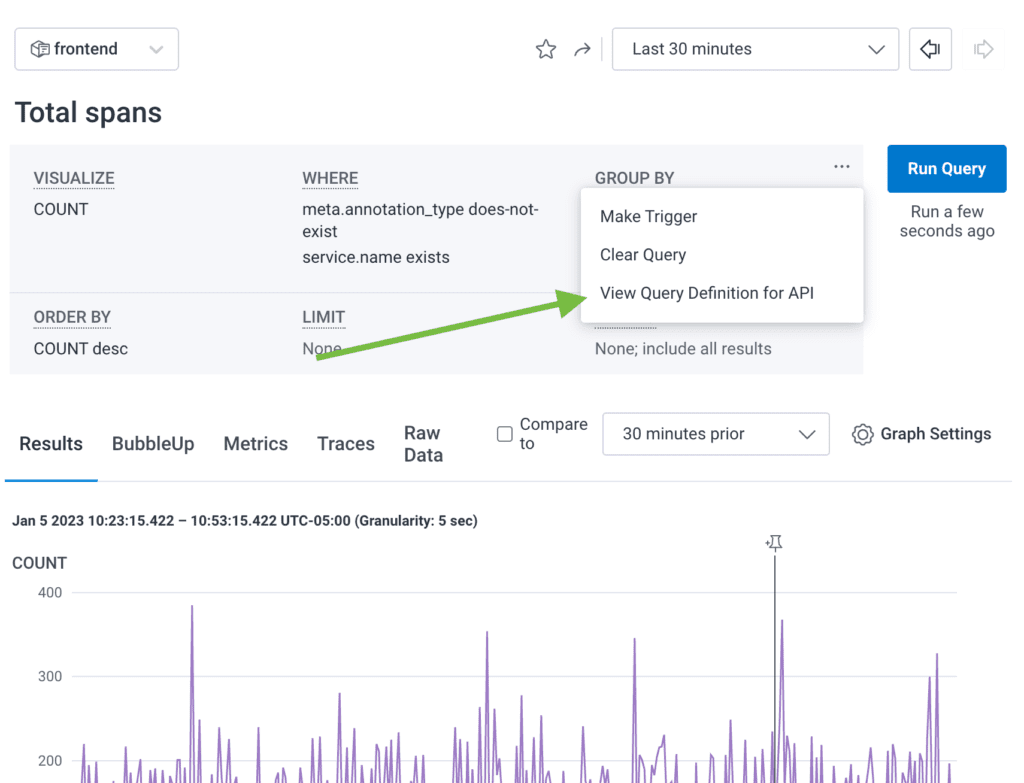
You can simply take the JSON and throw it into the query_json of a resource "honeycombio_query". Just like that, you have your first building block.
After you have a few queries, create a Board or a Trigger based on them, and you’re off to the races!
What if there are already a lot of things?
Rather than trying to handcraft dozens, hundreds, or thousands of resources in Terraform (or add them without considering the current state), you can use a nice tool called Terraformer. There is a Honeycomb provider for Terraformer which allows you to extract resources that have been created.
It’s a little bit like old web design tools: they get the job done, but don’t generate the most elegant (or even readable) code.
The rest of the post will go through how to use Terraformer, do a bit of housekeeping, and then apply and manage IaC resources with Terraform.
Getting Terraformer
The repo has some good information on how to use it. If you’re only using it for the Honeycomb resources, you can use these commands to install the binary on Linux systems:
export PROVIDER=honeycombiocurl -LO https://github.com/GoogleCloudPlatform/terraformer/releases/download/$(curl -s https://api.github.com/repos/GoogleCloudPlatform/terraformer/releases/latest | grep tag_name | cut -d '"' -f 4)/terraformer-${PROVIDER}-linux-amd64chmod +x terraformer-${PROVIDER}-linux-amd64sudo mv terraformer-${PROVIDER}-linux-amd64 /usr/local/bin/terraformer
Extract the existing resources
To start, you’ll need an API key that can manage ALL the resources in Honeycomb. These are the same permissions needed for resource creation and management, so you can call the key IaC or Terraform and reuse it later.
HONEYCOMB_API_KEY=my-api-key \ terraformer import honeycombio \ --resources="board,trigger,derived_column,slo,query,recipient,query_annotation" \ --path-pattern "{output}" \ --path-output output
This command creates a directory called output and fills it with a file for each resource being created. It is scoped to the whole API key, which is the Environment layer in the application.
Hint: If you want to manage multiple environments, you’ll need to run export and apply steps with each API key.
Housekeeping the IaC
Terraformer doesn’t create the right provider, so unfortunately, we have to make a change there. First, fix it in the tfstate file:
cd outputterraform state replace-provider -- -/honeycombio honeycombio/honeycombio
Then, fix the provider.tf file by setting its contents to this:
provider "honeycombio" { api_url = "https://api.honeycomb.io"}terraform { required_providers { honeycombio = { source = "honeycombio/honeycombio" version = "~> 0.12.0" } }}
The Terraform provider is on a newer version, so you can update that version number to the latest one.
Using IaC for migrations
If all you’re trying to do is migrate from one place to another with this bout of IaC activity, there’s no need to clean up any more than that.
Make an API Key in the destination environment with all the permissions.
$ HONEYCOMB_API_KEY=$HONEYCOMB_API_KEY_PROD \ terraform planHONEYCOMB_API_KEY=$HONEYCOMB_API_KEY_PROD \ terraform plandata.terraform_remote_state.local: Reading...data.terraform_remote_state.local: Read complete after 0s...Note: Objects have changed outside of TerraformTerraform detected the following changes made outside of Terraform since the last "terraform apply" which may have affected this plan:
After the final line above about detecting changes, it’ll show all the things that it exported. These are present in the state file since the export was run where they were. Terraform is okay with this.
It will show something like Plan: 7 to add, 0 to change, 0 to destroy. If it’s trying to change or destroy things, the API key may be pointed at the wrong place—or people have already migrated some stuff. Carefully scrutinize the changes and destructions before proceeding.
Alternately, it may also show Warning: Argument is deprecated about some fields—like dataset—which changed in 2022. The providers and APIs should handle deprecations gracefully, but if you’re looking at this post some years in the future, it may require intervention.
Migration needs data
If you’re migrating from one place to another, the datasets and columns need to exist before you apply your Terraform resources. The easiest way to generate those is to send traces to the environment. If it’s production data, having an OpenTelemetry Collector with two exporters can send the same data to both the old and new locations. Otherwise, simply change the API Keys in the applications and let the new data flow in.
Migration needs redos
Terraformer is great, but if we had to pick one thing that caused us some grief it would be that resources should be tied together by name, but are instead tied by a string/variable.
What this means for migration is that the items that have dependencies can’t be created until the dependencies exist. The good news is that Terraform will create the ones it can on each run, so you’ll successively work you way up the hierarchy of dependencies. The other good news is that Honeycomb’s objects don’t nest very much so a run for derived columns and queries, query annotations (named queries) and SLOs, and a final run for boards should suffice. Woohoo!
I want reusable IaC forever
Whether you’ve chosen to migrate or are codifying your infrastructure, the next section walks through refining the HCL into useful and reusable parts. Let’s start by putting it in a git repository!
You probably want the output folder name to be something simple, like honeycomb-iac.
cd .. && mv output honeycomb-iac && cd honeycomb-iacgit initecho ".terraform*\nterraform.tfstate*" > .gitignoregit add .git commit -m "Initial terraform resource extraction"
Add a remote with git remote add origin https://github.com/... and git push.
With the starting point memorialized, you can be more reckless with the text files and still be able to get back what was in the original export if needed.
1. Reduce the amount of content
The first thing we want to do is find the important stuff: the elements of the Honeycomb experience that bring value to the team. Here are some suggested checks:
- SLOs that are active, have alerts, and aren’t at 0% or 30,000% burned
- Triggers that have recipients whether they’re triggered currently or not
- Boards that are named and have query annotations, names, and descriptions
- Envrionment-wide derived columns (probably all of them)
- Derived columns used in SLOs, trigger queries, and board queries
The other thing to note about derived columns is if several have different names but similar formulas. This may indicate that people with different perspectives are trying to accomplish the same goal, which would be served by unifying attempts into one that is sure to get them the best answer.
All of the above is best done through the Honeycomb web browser experience. Finding these things in the code isn’t impossible, but it’s not so easy.
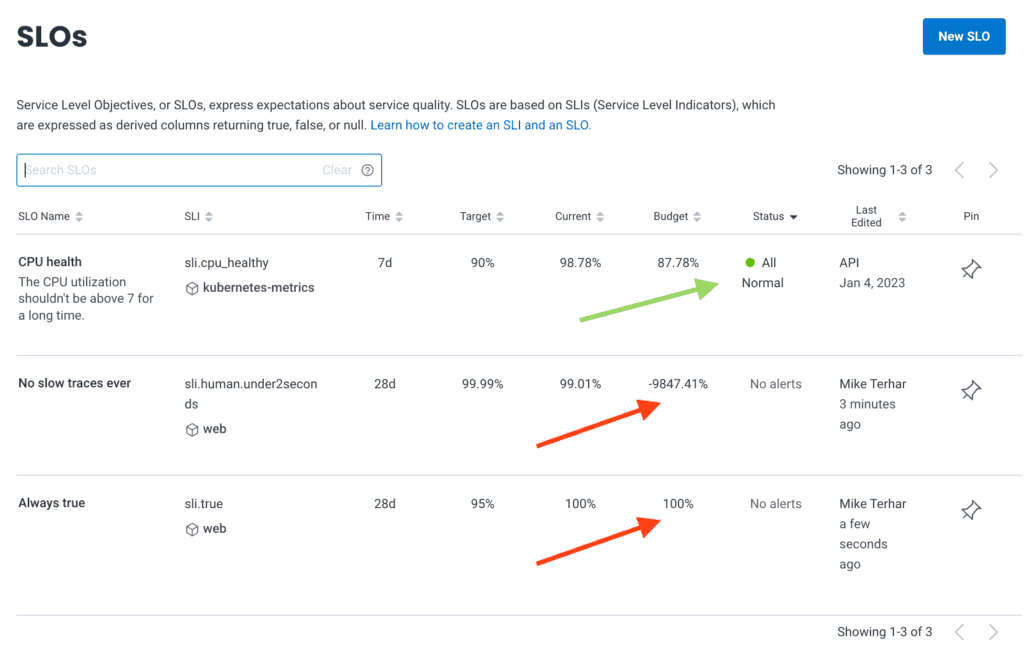
In the above screenshot, only the CPU health SLO has an alert and reasonable budget.
If you have SLOs with similar names, it may be easier to use the identifier. To find the SLO identifier, you can click the name of it on this page and look at the URL bar.
demo/environments/prod/datasets/kubernetes-metrics/slo/kaH65PpYJHw/CPU-health[team]/environments/[environment]/datasets/[dataset]/slo/[slo_id]/[slo_name]
For this SLO, we can just search through the .tf files for kaH65PpYJHw and there should be only one. Boards and queries have a similar pattern.
Once you have your list of item names or identifiers, you can search the code and collect them into a new location that is logically grouped by purpose rather than resource type.
2. Organize and collect
After that investigation, you’ll have names and IDs to find. As you find the boards, you’ll need to go over to the query_annotations.tf file to grab the dependencies. Then, head on over to the query.tf file and grab the dependencies. This part will be a bit tedious.
As you find and move stuff, add commits to your Git repo often. The diffs can help discover where a copy/paste grabbed too much—or not enough—if there are errors. Also, we recommend that you run terraform fmt and terraform validate before each commit to get alerts for any big mistakes. The downside to terraform fmt is that it shifts whitespace around quite a bit. The git diff --ignore-all-space command will be your friend.
3. Fix references between items
Terraformer’s output uses a outputs.tf file with each resource’s .id set as a string.
Here’s an example of a board with a query on it:
resource "honeycombio_board" "tfer--tUMzAigrufd" { name = "bfd.so Health" query { dataset = "kubernetes-metrics" query_annotation_id = data.terraform_remote_state.local.outputs.honeycombio_query_annotation_tfer--prJLufjsjrY_id query_id = data.terraform_remote_state.local.outputs.honeycombio_query_tfer--2kz9nCCvDP3_id query_style = "combo" } style = "visual"}resource "honeycombio_query_annotation" "tfer--prJLufjsjrY" { dataset = "kubernetes-metrics" description = "CPU and Memory alongside uptime" name = "Mastodon-bfd metrics" query_id = data.terraform_remote_state.local.outputs.honeycombio_query_tfer--2kz9nCCvDP3_id}resource "honeycombio_query" "tfer--2kz9nCCvDP3" { dataset = "kubernetes-metrics" query_json = "{\n \"calculations\": [\n {\n \"op\": \"P95\",\n \"column\": \"metrics.memory.usage\"\n },\n {\n \"op\": \"P95\",\n \"column\": \"metrics.cpu.usage\"\n },\n {\n \"op\": \"MAX\",\n \"column\": \"metrics.uptime\"\n }\n ],\n \"filters\": [\n {\n \"column\": \"k8s.namespace.name\",\n \"op\": \"=\",\n \"value\": \"mastodon-bfd\"\n }\n ],\n \"breakdowns\": [\n \"k8s.pod.name\"\n ],\n \"orders\": [\n {\n \"op\": \"P95\",\n \"column\": \"metrics.memory.usage\",\n \"order\": \"descending\"\n }\n ],\n \"time_range\": 86400\n}"}output "honeycombio_query_annotation_tfer--prJLufjsjrY_id" { value = honeycombio_query_annotation.tfer--prJLufjsjrY.id}output "honeycombio_query_tfer--2kz9nCCvDP3_id" { value = honeycombio_query.tfer--2kz9nCCvDP3.id}
For some reason, resource points to output blocks, which point back to resource using their proper names.
All we need to do for Terraform to be able to infer the dependency tree is change the data... into the resource name.
Here’s a kinda-gross-but-worked-okay set of commands that can do this for you… if the stars align:
sed -i 's/data.terraform_remote_state.local.outputs.honeycombio_query_tf/honeycombio_query.tf/g' *.tfsed -i 's/data.terraform_remote_state.local.outputs.honeycombio_query_annotation_tf/honeycombio_query_annotation.tf/g' *.tfsed -i 's/_id$/.id/g' *.tf
If all of this works right, you can actually get rid of the state file since the output is no longer needed. You can also move to a remote state or whatever else you want.
4. Turn the gems into reusables
You may have noticed that objects are mostly nicely linked together, with one exception: query_json is an unwieldy string.
What the terraform provider does: it takes a honeycombio_query_specification data object and renders it into JSON, which can then be referenced with the query_json parameter. We need to convert the raw JSON back into an HCL spec so we can reuse it—or at least better control it.
This is a scenario where it’s disappointing that HCL and JSON are similar but different enough that we need to use brain power to reformat it. If you simply copy the string and echo it into a terminal, it’ll render the \n and show a pretty nice looking json.
data "honeycombio_query_specification" "pod_metrics" { calculation { op = "P95" column = "metrics.memory.usage" } calculation { op = "P95" column = "metrics.cpu.usage" } calculation { op = "MAX" column = "metrics.uptime" } filter { column = "k8s.namespace.name" op = "=" value = "mastodon-bfd" } breakdowns = [ "k8s.pod.name" ] order { op = "P95" column = "metrics.memory.usage" order = "descending" } time_range = 86400}resource "honeycombio_query" "tfer--2kz9nCCvDP3" { dataset = "kubernetes-metrics" query_json = data.honeycombio_query_specification.pod_metrics.json}
This change doesn’t get us much, but we can now replace some of the values with variables. The two that are most obvious to me are the filter value and the time range:
variable "query_time_range" { description = "Query Default Time Range (in seconds). Defaults to 86400 (24 hours)" type = number default = 86400}variable "namespace_name" { description = "Namespace to filter queries for this board" type = string default = "mastodon-bfd"}data "honeycombio_query_specification" "pod_metrics_2kz9nCCvDP3" { ... filter { column = "k8s.namespace.name" op = "=" value = var.namespace_name } ... time_range = var.query_time_range}# And be sure to update the board name so you don't have colissions.resource "honeycombio_board" "tfer--tUMzAigrufd" { name = "${var.namespace_name} Health" ...}
For queries that reference derived columns, they are part of a string within the spec. You can either change the column = to point to the resource object by name or you can add a depends_on block.
This example goes through how to do it with a query, but derived columns have the same flow. Create a reusable honeycombio_derived_column resource with a variable under dataset so you can apply it to multiple places.
Note: If you’re using the same dataset but applying it to different environments, that’s controlled by the API key so there’s no variable in the Terraform files for that.
5. Add flexibility to queries with templates
When using the honeycombio_derived_column resource above, it’s just a string. If you wanted to have a bunch of similar derived columns, you’d need lots of strings.
One way to scale more easily is to convert the expression from a string to a template file. The template() method allows you to easily reference your derived column code from somewhere else in your module. For example:
resource "honeycombio_derived_column" "dc_db_system_or_type" { alias = "dc_db_system_or_type" dataset = "__all__" description = "Returns the database system if available or the database type if available" expression = templatefile("${path.module}/templates/db_system_or_type.dctpl", {})}
And then, you can have a nicely formatted template for the Derived Column that is easier to maintain:
COALESCE( $db.system, $db.type, null)
You can also easily use Terraform’s template syntax to customize your derived columns based on variables in your module:
IF( BOOL( OR( AND( EXISTS($http.status_code), GTE($http.status_code, ), AND( EXISTS($status_code), GT($status_code, 1), ${ count_400s_as_errors ? 400 : 500 }) ), %{ if query_rpc ~) AND( EXISTS($rpc.grpc.status_code), GT($rpc.grpc.status_code, 1) ) %{ endif } ) ), 100. 0)
Read more on using Templates in Terraform here.
6. Promote to a module
Once you have some good signals that work across multiple projects, perhaps metrics and spans that are part of auto-instrumentation or common libraries, you can create a module from the exported resources and newly created data/variable objects. This will make it similar to how the Starter Pack for OpenTelemetry is packaged.
To make it a locally referencable module, move these things into a well-named directory (such as ~/k8s_pod_metrics. Finally, create a versions.tf file therein, which specifies provider info.
terraform { required_version = ">= 0.13" required_providers { honeycombio = { source = "honeycombio/honeycombio" version = "= 0.12.0" } }}
Again, update version information as time passes.
7. Use the module
From a directory where you want to make use of this ~/k8s_pod_metrics module, create a main.tf file with the following:
module "honeycombio_k8s_pod_metrics" { source = "~/k8s_pod_metrics" time_range = "7200" namespace_name = "mastodon-bfd"}
The time range value at 7200 will show the last two hours rather than a full day.
What’s next?
If you’re starting from scratch, check out the Starter Pack for OpenTelemetry.
Depending on the size and complexity of your organization, software stack, and customer base, there may be a lot of work required to codify all your resources. Avoid dedicating a lot of time to one-off resources that aren’t in current or frequent use.
There are some things you can do to stay on top of organic growth:
- Periodically review the History tab in Honeycomb to see what people are accessing
- Check incident reviews or retrospectives for links to Honeycomb Boards that were useful
- When a new tech stack is introduced or an old one is upgraded, leverage the new spans
- Whenever manual instrumentation is improved, add the extra contexts to your IaC
Maybe most important of all, make the module code easy for developers and operators to reuse, reference, and update as needed.
If you haven’t already signed up for Honeycomb, please do so today! We have a useful free tier with 20 million events per month.
Want to know more?
Talk to our team to arrange a custom demo or for help finding the right plan.